Contribute to this page on GitHub
Troubleshooting LiquidLauncher
Use the following guide to troubleshoot common issues with LiquidLauncher. Only contact us through our contact page or on our Discord after you verified that all the possible solutions listed here didn't solve your problem.
LiquidLauncher does not show up (Windows)
This is a known issue if you've previously uninstalled Microsoft Edge or used so-called Windows debloat tools. LiquidLauncher uses Edge Webview2 to run - which is a core feature of your Windows operating system.
To fix this problem, you can simply download and install Microsoft Webview2. After that, your launcher will appear as expected.
LiquidBounce download does not finish (SmartScreen issue)
This is a known bug on Windows 10. We are currently working on a proper fix. For now, please disable Windows Smart Screen to solve the issue. You can do so by following these steps:
- Open the start menu and search for Windows Security.
- Open the program and select App & browser control.
- Click Reputation based protection settings.
- Uncheck Check apps and files and SmartScreen for Microsoft Edge.
- Restart your computer and try again.
Failed to establish connection with LiquidBounce API
Using Cloudflare WARP
Cloudflare WARP is a free VPN service that can help resolve connection issues with the LiquidBounce API. Here's how to set it up:
- Download Cloudflare WARP from the official website.
- Install the application by following the on-screen instructions.
- Once installed, open the Cloudflare WARP application.
- Click on the "Connect" button to establish a VPN connection.
- After the connection is established, restart LiquidLauncher.
If you're still experiencing issues after using Cloudflare WARP, try the following:
- Open the Cloudflare WARP application settings.
- Navigate to "Preferences" or "Settings" depending on your operating system.
- Enable "WARP+" mode if available or try switching between different WARP modes.
- Restart your computer and try launching LiquidLauncher again.
Using a VPN like Cloudflare WARP can help bypass network restrictions or resolve routing issues that might be preventing LiquidLauncher from connecting to the LiquidBounce API.
Fixing issues with the system's hosts file
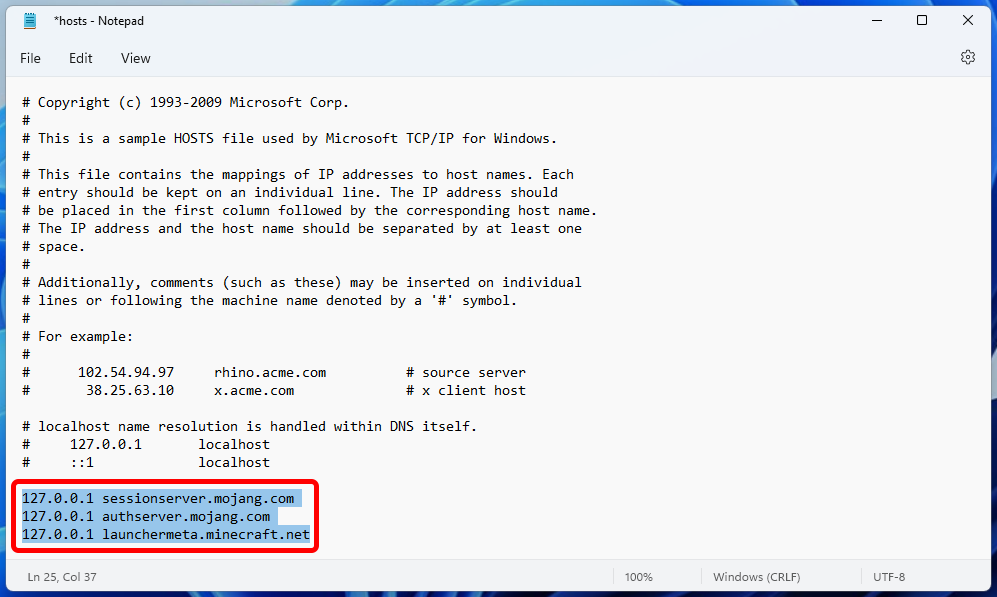
Some alternative Minecraft authentication services like TheAltening may make changes to your system's hosts file. These can cause error messages like the following:
- "The authentication servers are down for maintenance."
- "The authentication servers are currently not reachable."
- "Please switch to Mojang mode."
- "Not authenticated with minecraft.net."
- It may also prevent LiquidLauncher from working properly ("An error with the client occured: Connection to https://launchermeta.mojang.com/ failed.").
- java.net.ConnectException: Connection refused: getsockopt
To reset your hosts file and fix these issues, follow the these instructions for your respective operating system.
On Windows
-
Search for notepad in start menu, right-click it, and run it as an administrator.

-
Click Yes to allow the program to make changes to your device.

-
In the Notepad window, click File and then select Open....

-
Navigate to C:\Windows\System32\drivers\etc\.
-
Select All Files from the drop down in the bottom right corner of the window.
-
Open the file called hosts.

-
Remove all lines containing one of the following words:
- minecraft
- mojang
- microsoft
- xbox
- live

- Save the file and restart your computer.
The problems should now be resolved.
On macOS and Linux
- Open a terminal.
- Execute
sudo nano /etc/hosts. - Enter your computer's password when prompted.
- Move the cursor using the arrow keys and delete all lines containing either mojang or minecraft.
- Press Ctrl + O to save and Ctrl + X to exit.
- Restart your computer.
The problems should now be resolved.
References
These instructions are based on the ones provided by sparkuniverse.notion.site.
Fixing issues with the DNS server
DNS servers resolve domain names to their corresponding IP address. A misconfigured DNS server can lead to connection issues. We recommend using 1.1.1.1, a DNS server provided by Cloudflare. To set a DNS server, please follow these instructions:
On Windows 11
- Go to Settings.
- Select Network & internet
- Select Wi-Fi or Ethernet depending on your connection.
- If you selected Wi-Fi in the previous step, click Properties of [your wifi's name].
- Under DNS server assignment, select Edit.
- From the drop-down menu, select Manual.
- Turn on the IPv4 toggle switch.
- Under Preferred DNS, enter
1.1.1.1and1.0.0.1. - Hit Save and restart your computer.
On Windows 10, 8 & 7
- Open the control panel.
- Select Network and Sharing Center.
- Click Change adapter settings on the left side of the window.
- Double click your current internet connection whether it’s Wi-Fi or Ethernet.
- Click Properties in the window that popped up.
- Select Internet Protocol Version 4 (TCP/IPv4) from the list under This connection uses the following items.
- Press Properties.
- Change the radio button to Use the following DNS server addresses.
- Enter
1.1.1.1as preferred DNS and1.0.0.1as alternate DNS. - Press OK and restart your computer
On macOS
Please follow this guide provided by Apple.
On Linux
DNS configuration varies depending on your distribution and desktop environment. Please lookup a matching guide yourself. Since you are a Linux user, you probably know how to use a search engine.